 itOffside
สร้าง Message boxes ด้วย jquery toastmessage plugin
jquery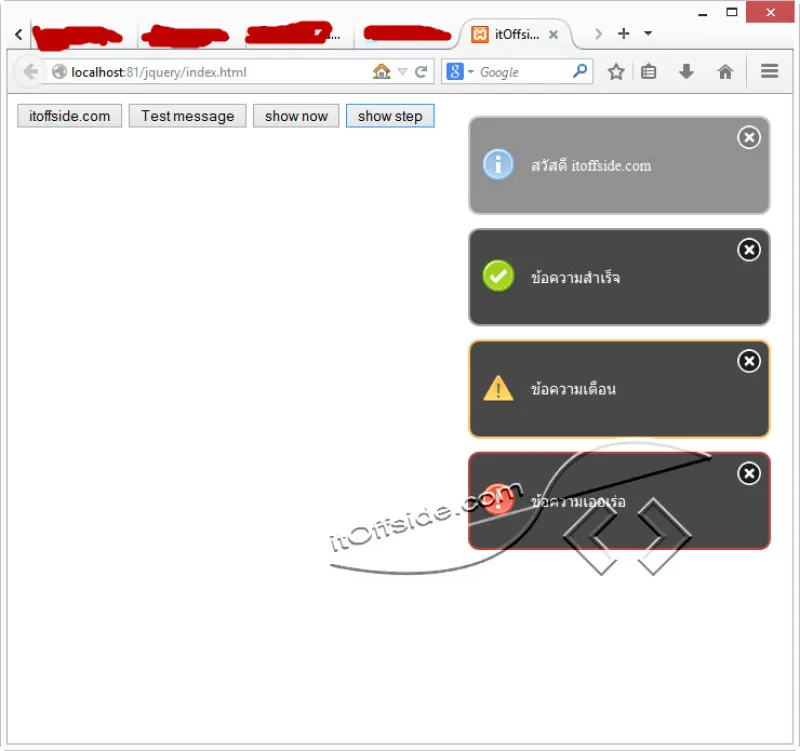
jquery-toastmessage-plugin คือปลักอินของ jquery ที่ผู้สร้างทำขึ้นมาเพื่อใช้งานในการแสดงข้อความที่สวยงาม การใช้งานง่ายๆ โดยคุณสามารถโหลดปลักอินได้ที่เว็บไซต์ http://akquinet.github.io/jquery-toastmessage-plugin/ หลังจากที่คุณดาวน์โหลดไฟล์ปลักอินมาแล้วให้นำมาไว้ที่โปรเจ็คหรือเว็บไซต์ของคุณโดยไฟล์ที่ดาวน์โหลดจำเป็นต้องใชคือไฟล์
- jquery.toastmessage.js
- jquery.toastmessage.css
- โฟล์เดอร์ image
และไฟล์หลักๆที่ต้องใช้ jquery คุณสามารถดาวน์โหลดได้ที่เว็บไซต์ http://jquery.com/
หลังจากเตรียมไฟล์ให้คุณสร้างไฟล์ index.html แล้วแทรก code CSS ไว้ภายใน <header>
<link rel="stylesheet" href="css/jquery.toastmessage.css">และแทรก code javascript ไว้ภายใน <header>
        <script type="text/javascript" src="js/jquery.1.11.1.min.js"></script>
        <script type="text/javascrpit" src="js/jquery.toastmessage.js"></script>
หลัง Add ไฟล์ ที่ต้องการใช้งานแล้วต่อไปเป็นวิธีการเรียกใช้งาน ให้เขียนคำสั่ง jquery ใน header (จริงๆไม่จำเป็นต้อง header อาจจะเป็นบรรทัดล่างสุดของ body)
        <script type="text/javascript">
            $(document).ready(function(){
                $().toastmessage('showNoticeToast','Hello message');
            });
        </script>
เสร็จเรียบร้อยแล้ว ลอง กด Refresh หน้าจอแล้วจะเห็นข้อความโชว์ตามรูปภาพตัวอย่างด้านล่าง
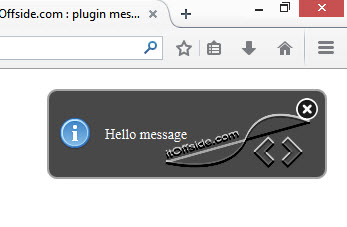
ขั้นตอนต่อไปผู้เขียนใช้ Event ตอน Click แล้วแสดงข้อความ โดยคุณสามารถเขียน code เพิ่มเติมตามตัวอย่างด้านล่างนี้ (เป็น Code เต็ม)
<!DOCTYPE html>
<html>
    <head>
        <title>itOffside.com : plugin message</title>
        <meta charset="UTF-8">
        <meta name="viewport" content="width=device-width, initial-scale=1.0">
        <link rel="stylesheet" href="css/jquery.toastmessage.css">
        <script type="text/javascript" src="js/jquery.1.11.1.min.js"></script>
        <script type="text/javascript" src="js/jquery.toastmessage.js"></script>
        <script type="text/javascript">
            $(document).ready(function() {
                $("#notice").click(function() {
                    $().toastmessage('showNoticeToast', 'สวัสดี itoffside.com');
                });
                $("#success").click(function() {
                    $().toastmessage('showSuccessToast', 'ข้อความสำเร็จ');
                });
                $("#warning").click(function() {
                    $().toastmessage('showWarningToast', 'ข้อความเตือน');
                });
                $("#error").click(function() {
                    $().toastmessage('showErrorToast', 'ข้อความเออเร่อ');
                });
            });
        </script>
    </head>
    <body>
        <form>
            <input type="button" value="itoffside.com" id="notice">
            <input type="button" value="Test message" id="success">
            <input type="button" value="show now" id="warning">
            <input type="button" value="show step" id="error">
        </form>
    </body>
</html>
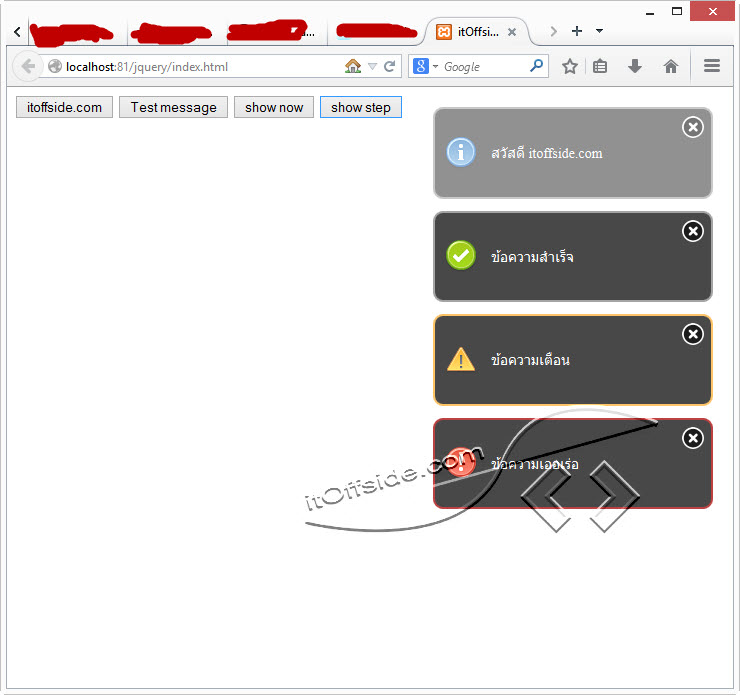
ผลลัพธ์ที่ได้
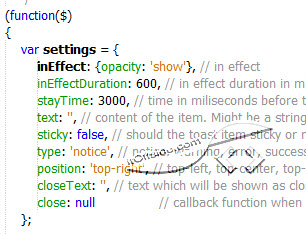
ซึ่งหลายคนอาจจะต้องการปรับแต่งความสามารถการแสดงผลข้อความ สามารถปรับแต่งได้ที่ไฟล์ jquery.toastmessage.js ใน code ด้านล่างนี้ ซึ่งจะเป็นการปรับแต่งทั้งระบบ
และผู้อ่านสามารถปรับแต่งการแสดงข้อความได้ในไฟล์ index.html (เฉพาะเจาะจงไฟล์ใดไฟล์หนึ่ง) เพิ่มเติมจาก Code เดิมเป็น
                $("#notice").click(function() {
                    $().toastmessage('showToast', {
                        text : 'ปรับแต่งให้ข้อความอยู่หน้าจอ',
                        sticky : false,
                        type : 'notice',
                        position : 'middle-center'
                    });
                });
Code เต็ม
<!DOCTYPE html>
<html>
    <head>
        <title>itOffside.com : plugin message</title>
        <meta charset="UTF-8">
        <meta name="viewport" content="width=device-width, initial-scale=1.0">
        <link rel="stylesheet" href="css/jquery.toastmessage.css">
        <script type="text/javascript" src="js/jquery.1.11.1.min.js"></script>
        <script type="text/javascript" src="js/jquery.toastmessage.js"></script>
        <script type="text/javascript">
            $(document).ready(function() {
                $("#notice").click(function() {
                    $().toastmessage('showToast', {
                        text : 'ปรับแต่งให้ข้อความอยู่หน้าจอ',
                        sticky : false,
                        type : 'notice',
                        position : 'middle-center'
                    });
                });
                $("#success").click(function() {
                    $().toastmessage('showSuccessToast', 'ข้อความสำเร็จ');
                });
                $("#warning").click(function() {
                    $().toastmessage('showWarningToast', 'ข้อความเตือน');
                });
                $("#error").click(function() {
                    $().toastmessage('showErrorToast', 'ข้อความเออเร่อ');
                });
            });
        </script>
    </head>
    <body>
        <form>
            <input type="button" value="itoffside.com" id="notice">
            <input type="button" value="Test message" id="success">
            <input type="button" value="show now" id="warning">
            <input type="button" value="show step" id="error">
        </form>
    </body>
</html>
จบบทความสำหรับบทความนี้แล้วทางผมหวังว่าจะเป็นประโยชน์มากสำหรับทุกๆคนที่ต้องการกล่องข้อความที่เรียบง่ายและดูสวยงาม การใช้งานไม่ยากจนเกินไป หากผู้อ่านแล้วยังไม่เข้าใจในบทความ เขียน Comment เพิ่มเติมครับ
แชร์บทความนี้
โปรแกรมเมอร์

ความเห็น
ยังไม่มีความเห็น — มาเป็นคนแรกได้เลย